Tracking ML experiments with MLFlow
MLFlow helps to data scientists to track their machine learning experiments. However, it provides more than that. Some of the main features:
- Python, Scala, Java SDK to log ML experiments metrics, parameters, ML model files
- Generic packaging format for ML models
- Model Registry to manage ML models
- Web UI
I will show how one can integrate MLFlow into existing code. I will use my existing Python project, where I used Spacy to train ML model for NLP/NER task.
Installation
We can use pip:
pip install mlflow
You should have Conda or Miniconda tool installed to work with MLFlow. It can be install from here.
Official documentation of MLFlow is quite good. You can use it, if you lost in my tutorial.
Web UI
Once MLFLow is installed, you can run its Web UI locally. You can also run it on your central server to be able to work in the team, so that you all will be able to see each other experiments. Start UI via the following command:
mlflow ui
mlflow is now your CLI tool that was installed via pip earlier. We will be using later for running experiments as well.
Open web browser at http://127.0.0.1:5000, if mlflow ui was executed successfully, i.e. it should be running in your shell.
In my case, I have such output in my shell:
mlflow ui

[2020-11-11 21:35:44 +0100] [43202] [INFO] Starting gunicorn 20.0.4
[2020-11-11 21:35:44 +0100] [43202] [INFO] Listening at: http://127.0.0.1:5000 (43202)
[2020-11-11 21:35:44 +0100] [43202] [INFO] Using worker: sync
[2020-11-11 21:35:44 +0100] [43205] [INFO] Booting worker with pid: 43205
Using MLFLow SDK
We are going to use MLFlow package which was install by pip as well. In order to integrate MLFlow with any Python code, we just need to import its package and use a couple functions to log our experiment metric.
from mlflow import log_metric, log_param, log_artifacts
import mlflow.spacy
Now we can use imported functions while training an ML model. Also, we import mlflow-spacy integration to save and load a Spacy model later in the code.
def train_spacy(data, iterations, drop_rate):
    nlp = spacy.blank('de')
    ner_pipe = 'ner'
    if ner_pipe not in nlp.pipe_names:
        ner = nlp.create_pipe(ner_pipe)
        nlp.add_pipe(ner, last=True)
    else:
        ner = nlp.get_pipe(ner_pipe)

    for _, annotations in data:
        for ent in annotations.get('entities'):
            ner.add_label(ent[2])

    log_param("drop_rate", drop_rate)  # <-- MLFlow tracking
    log_param("iterations", iterations) # <-- MLFlow tracking

    other_pipes = [pipe for pipe in nlp.pipe_names if pipe != ner_pipe]
    with nlp.disable_pipes(*other_pipes):  # only train NER
        warnings.filterwarnings("once", category=UserWarning, module='spacy')
        optimizer = nlp.begin_training()
        for itn in range(iterations):
            print("Statring iteration " + str(itn))
            random.shuffle(data)
            losses = {}
            for text, annotations in data:
                nlp.update(
                    [text],  # batch of texts
                    [annotations],  # batch of annotations
                    drop=drop_rate,  # dropout - make it harder to memorise data
                    sgd=optimizer,  # callable to update weights
                    losses=losses)
            log_metric("ner.losses", value=losses[ner_pipe], step=itn) # <-- MLFlow tracking
    return nlp
There are three places where we log our algorithm parameters and one metric "ner.losses". When we launch above code, it will log those values to local MLFlow file repository. One can also point MLFlow SDK to use remote server that will store all logged parameters, metrics and artefacts.
Let's call this function and store output model file into MLFlow file repository:
parser = argparse.ArgumentParser(description='NER Model training')
parser.add_argument('-d', dest='drop_rate', type=float,
                    help='SpaCy drop rate for training [0.0..0.9]')
parser.add_argument('-i', dest='iterations', type=int,
                    help='Number of iterations')
args = parser.parse_args()

training_data = transform_json('med-corpus.json')
prdnlp = train_spacy(training_data, args.iterations, args.drop_rate)
mlflow.spacy.log_model(spacy_model=prdnlp, artifact_path="model")
- We parse script arguments to pass their values to
train_spacyfunction. - We read the training data from JSON file and transform it to Spacy format.
- Once training data is available, we call
train_spacyto get a model object as a result of the training. - Last line is saving Spacy model via MLFlow API to MLFlow file repository.
Using MLFlow CLI
In order to start using MLFlow as CLI, we should add MLProject yaml file to source project
directory:
name: NER Medical Entities

conda_env: conda.yaml

entry_points:
  main:
    parameters:
      drop_rate: {type: float, default: 0.2}
      iterations: {type: int, default: 20}
    command: "python train_ner_model.py -d {drop_rate} -i {iterations}"
  test:
    parameters:
      run_id: {type: string}
    command: "python test_ner_model.py -r {run_id}"
Above files described MLProject entry points that we can execute via MLFlow CLI. Before doing that, we will create an experiment entry in the MLFlow file repository by running:
mlflow experiments create -n ner-medicine-spacy
It will output something like this:
...
Created experiment 'ner-medicine-spacy' with id 1
mlflow run -e main . -P drop_rate=0.25 -P iterations=30 --experiment-id 1
...
... INFO mlflow.projects: === Run (ID 'a689830e6fe245c8a2b025b4a2edee1a') succeeded ===
run is one of the option of mlflow CLI. It can execute one of the entry point from MLProject file. Above command executes main entry point which is training python script. We pass
two paramters via CLI that will be passed to the script as "-d {drop_rate} -i {iterations}". Then,
the train_ner_model.py script will parse these parameters as scipt arguments to be used
for train_spacy function.
At this point we can already see an entry at MLFlow UI under experiment name ner-medicine-spacy.
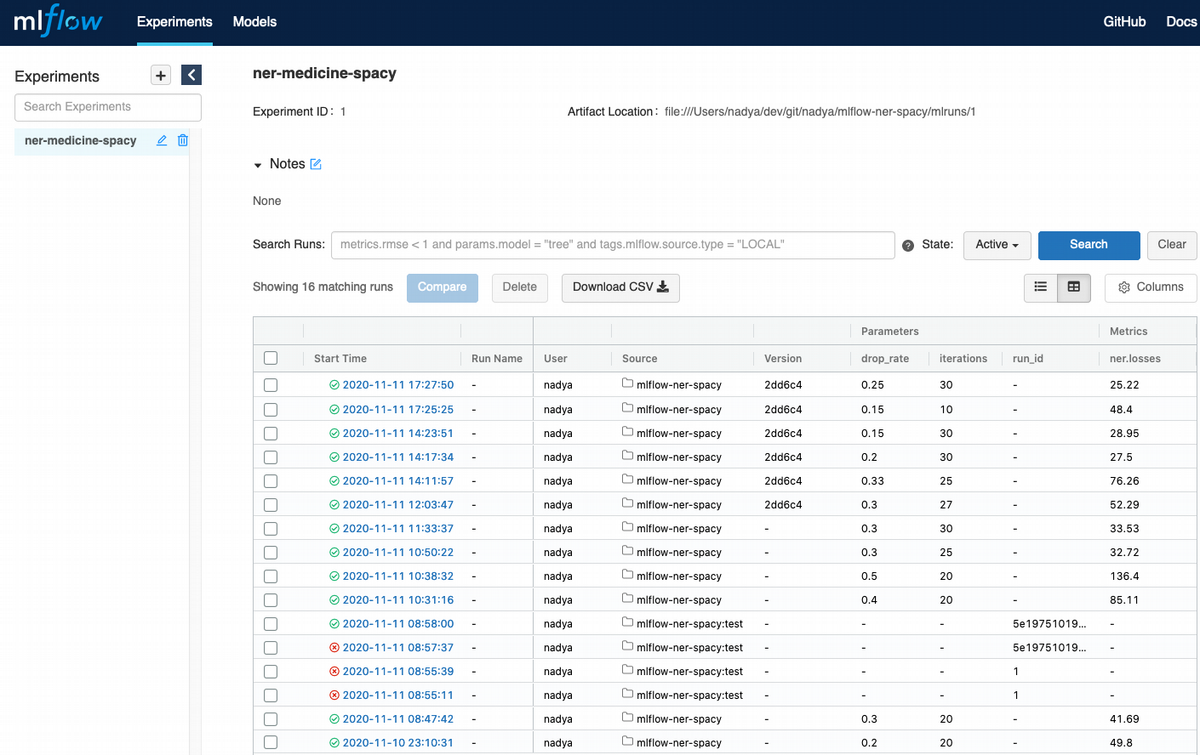
Chasing best parameters
My NER Spacy machine learning model gets better, if you have smaller loss function value. So we can go ahead and run below command with different parameters with get smallest loss value.
mlflow run -e main . \
 -P drop_rate=<some value between 0 and 0.9> \
 -P iterations=<some value more than 0> \
 --experiment-id 1
So I did that and got all runs logged in MLFlow:
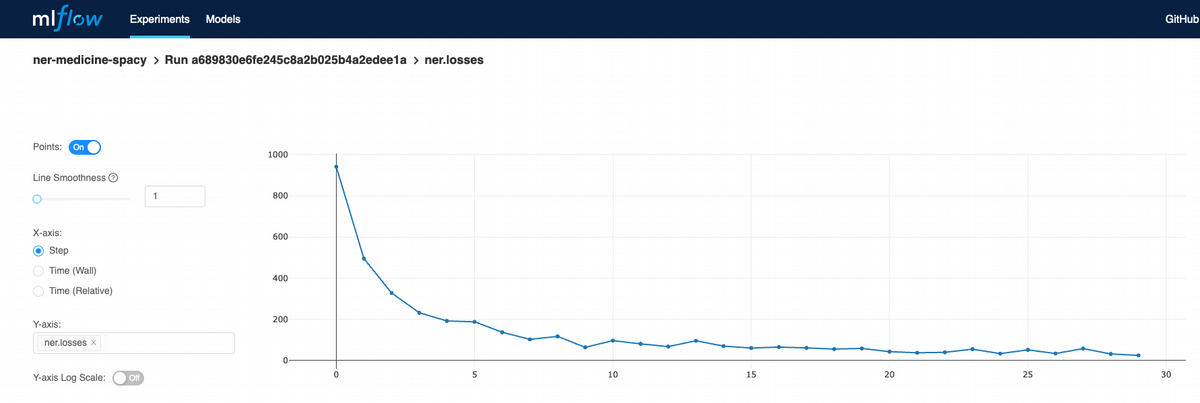
If I click on the last run, I even can see how loss function is moving on each iteration of learning process:
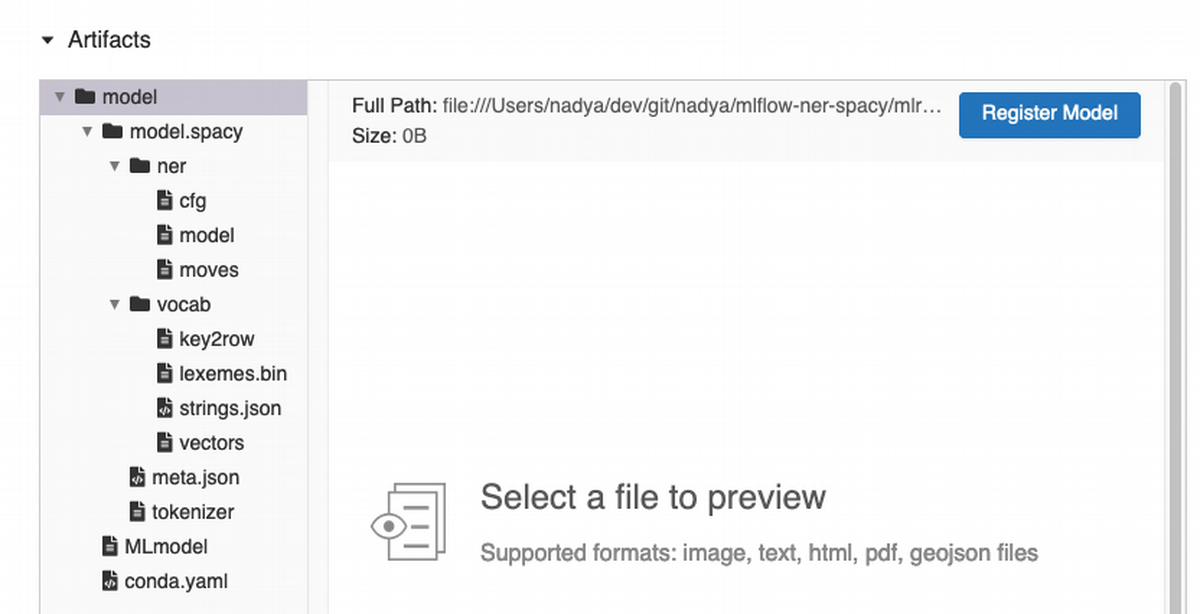
If go to my last run again and scroll down, I can see that my model
was saved as part of my local project file repository. Every
run gets unique id, so that I can easily find my Spacy model and use it for
deployment in production or share it to my team. Register Model button shows up, if I click on the model tree at the left hand side. This feature is designed to register my model from a specific training run to a remote or local MLFlow instance. Most of the time you will be using this feature with remote/shared instance of MLFlow.
Summary
MLFlow is useful tool to visualise machine learning experiments locally and share experiment result in the team via remote instance. MLFlow comes also with deployment APIs to expose a machine learning model as a RESTful service for scoring purposes. Unified model packaging format is perhaps one of the important feature, which helps to reproduce a machine learning experiment in another environment and move your machine model to production.
Links
Full project source code on GitHub: https://github.com/nnovakova/mlflow-spacy